Ford Custom 2012-2023 Locks and Security Solutions
Browse L4V's range of locks and security solutions for the Ford Custom 2012-2023
Click here for Custom 2023>
Hooklock/Deadlock fitting positions available
Side door
Barn doors
-
High

(Not suitable for glazed)
-
Mid
(Suitable for glazed)
-
Low
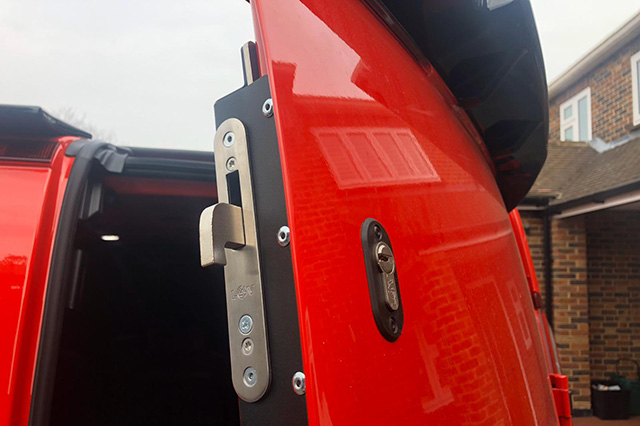
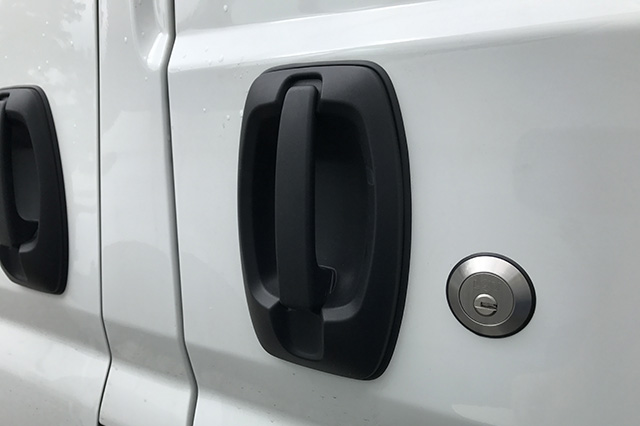
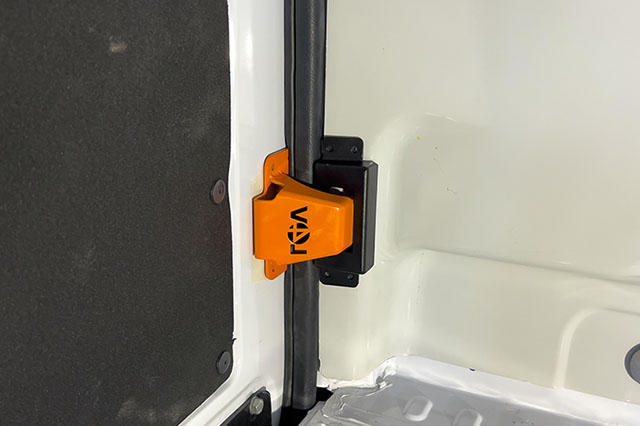
L4V Hook Lock
The L4V Hook Lock is a mechanical deadlock operating independently from the manufacturers' locking system. A deadlocking hook bolt engages into its opposing body section. Operated by its high-security external key under full control of the driver. Suitable for owner-drivers or applications where the driver can be relied upon to operate the lock.
Lock in a Box available for the high position on the barn & side load door.
Recommended Fitting Position
We recommend an L4V Hook lock fitted high in the side load door and a L4V Hook lock fitted in the high position on the rear barn doors.
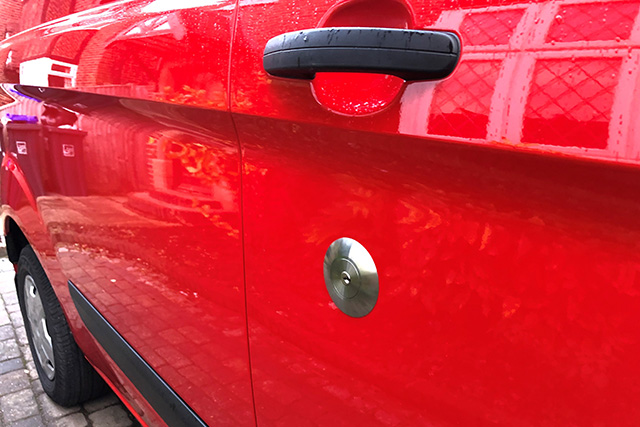
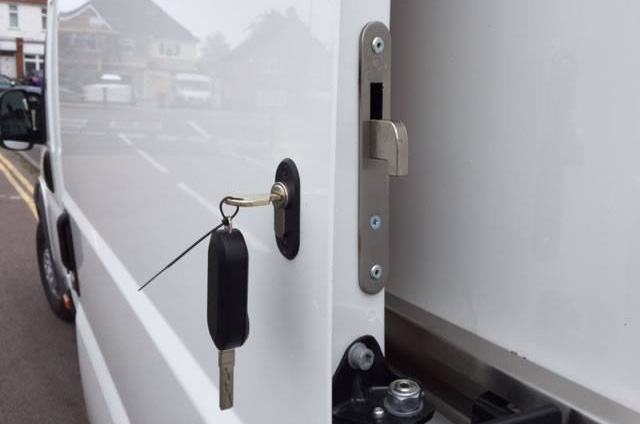
L4V Deadlock
The L4V Deadlock is a mechanical deadlock operating independently from the manufacturers’ locking system. It is very similar to the L4V Hook Lock however this lock engages a ‘straight bolt’ (20mm-50mm) into its opposing body section. Operated by its high-security external key under full control of the driver. Suitable for owner-drivers or applications where the driver can be relied upon to operate the lock. The L4V Deadlock is recommended for use on the vehicles cab doors.
Request a quote
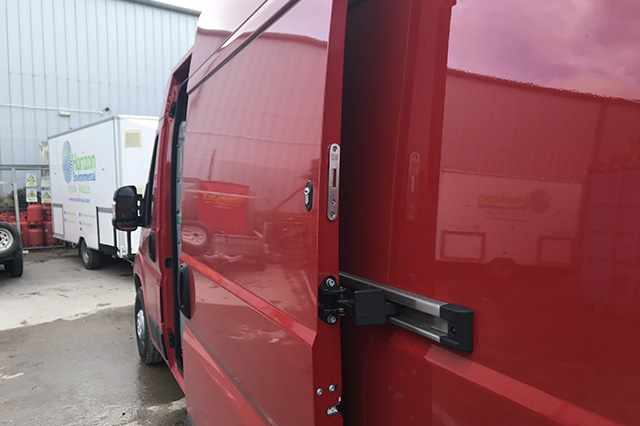
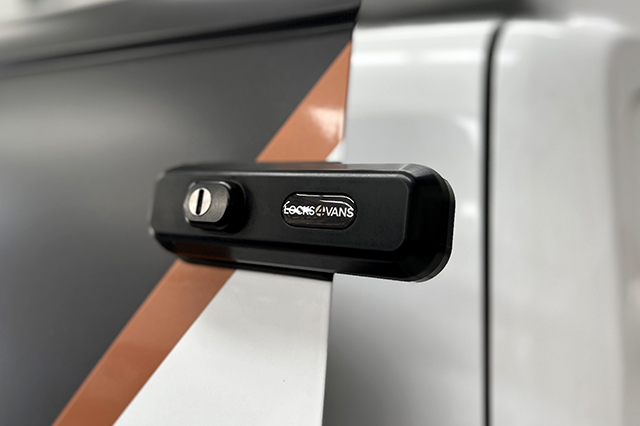
L4V Slamlock
The L4V Slamlock is primarily designed for couriers, multi-drop delivery drivers and any operations where a driver may be regularly in and out of a loading area throughout the day.
The L4V Slamlock safeguards against the driver forgetting to lock the doors. Once the door is shut it locks automatically and can only be opened using the L4V Slamlock key, reducing the chances of theft.
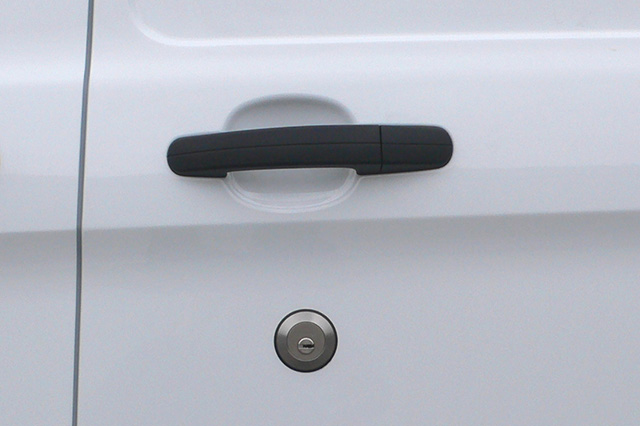
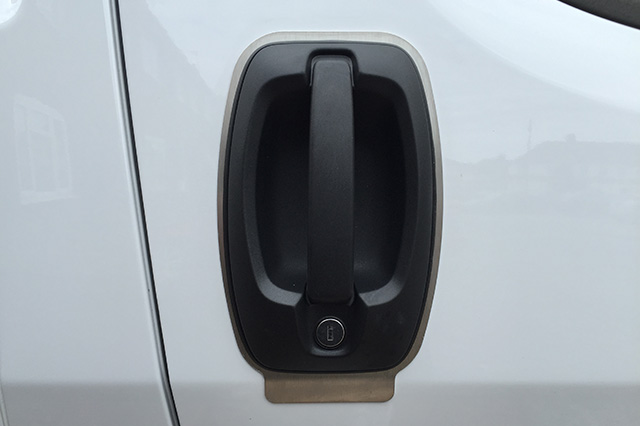
L4V Replacement Lock for Ford
We often find that Ford driver door locks are easily overcome by picking or forcing the cylinder. The L4V Replacement Lock for Ford is a high-security replacement barrel and bezel that has been designed to reduce the risk of these types of attack.
Request a quote
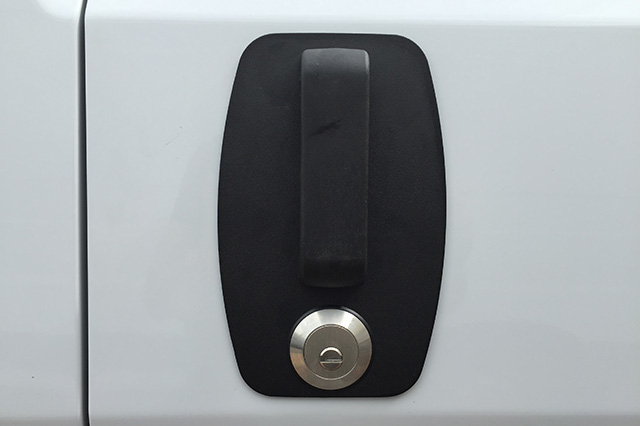
L4V Statement Lock
The L4V Statement Lock mounts externally to the doors of the vehicle, bracing them together while providing an effective visual deterrent. When fitted higher in the door it helps to reduce the risk of the door being bent down. As a deadlock working independently from the manufacturers’ locking system, it offers flexibility to the operator of the vehicle allowing them to use this extra security when required.
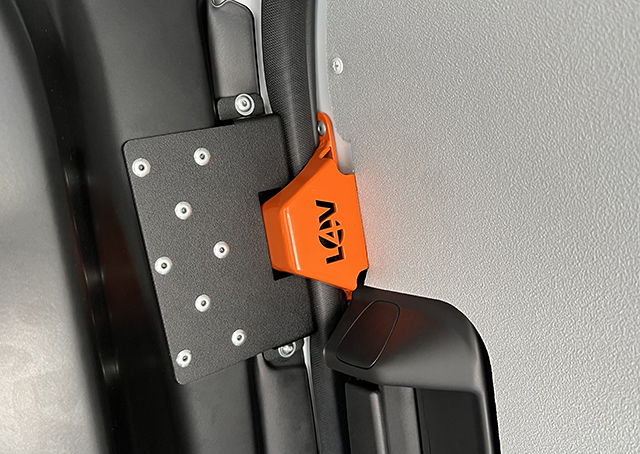
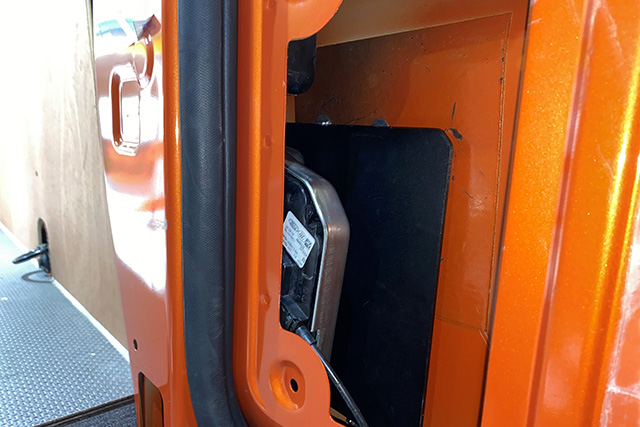
L4V Loom Guard
L4V Loom Guards reduce the risk of vulnerable areas of the vehicle body skin being cut or punctured giving access to the wiring loom. Available for the cab doors and rear door.
Request a quote
L4V Anti-Peel Kit
The Anti-Peel brackets for the Ford Custom are available for the N/S and O/S sliding door. Fitted to the front edge of the vehicles side load door and designed to reduce the risk of door peeling. Available in both HIGH and LOW positions.
Ideally used in conjunction with a hook lock in the high position of the same door.
L4V Barn Door Anti-Peel Kit
Specifically developed as an upgrade to the standalone high L4V Hook Lock. The combination of the the L4V Hook Lock and the solid Anti-Peel plate into one product greatly reduces the chances of barn doors being peeled down. The kit also has the added benefit of keeping the door secure if the central locking system has been disabled.
Anti-Peel Kit variation: this has also been adapted to work with a pre-existing L4V Hook lock in a mid position. Please specify this version when ordering.
Request a quote
L4V Internal Latch Shield
The L4V Latch Shields reduces the risk of the door handle being punctured to gain access to internal door mechanism for the load area.
These fits all STG's. The rear door does not fit with a Slamlock.
L4V Interior Handle Release Guards
L4V Interior Handle Release Guards are anti-spike kits using a combination of internal and external parts to reduce the risk of access to doors interior handles.
Request a quote
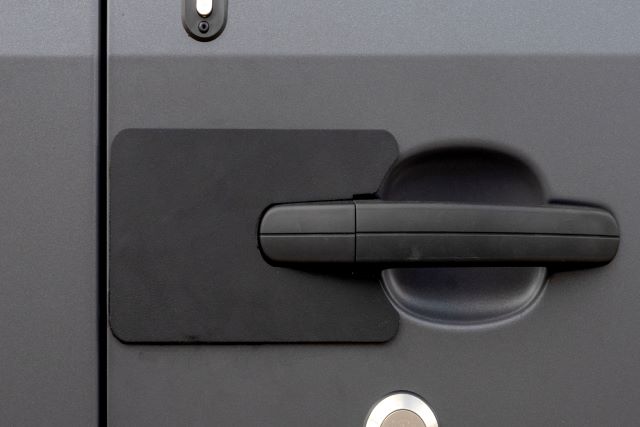
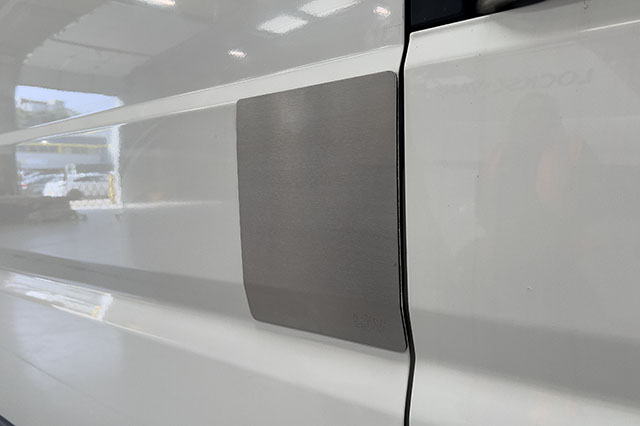
L4V External Shielding
The L4V External Latch Shields reduces the risk of the door skin being punctured to gain access to the internal door mechanism. Available for the N/S and O/S sliding doors in powder coated black and stainless steel.
L4V Handle Shields
Break-ins can occur as a result of the handle being spiked to gain access to the internal mechanisms that open the door. The L4V Handle Shields are door specific reducing the risk of this method of attack.These are available for the N/S sliding door and rear door.
Request a quote
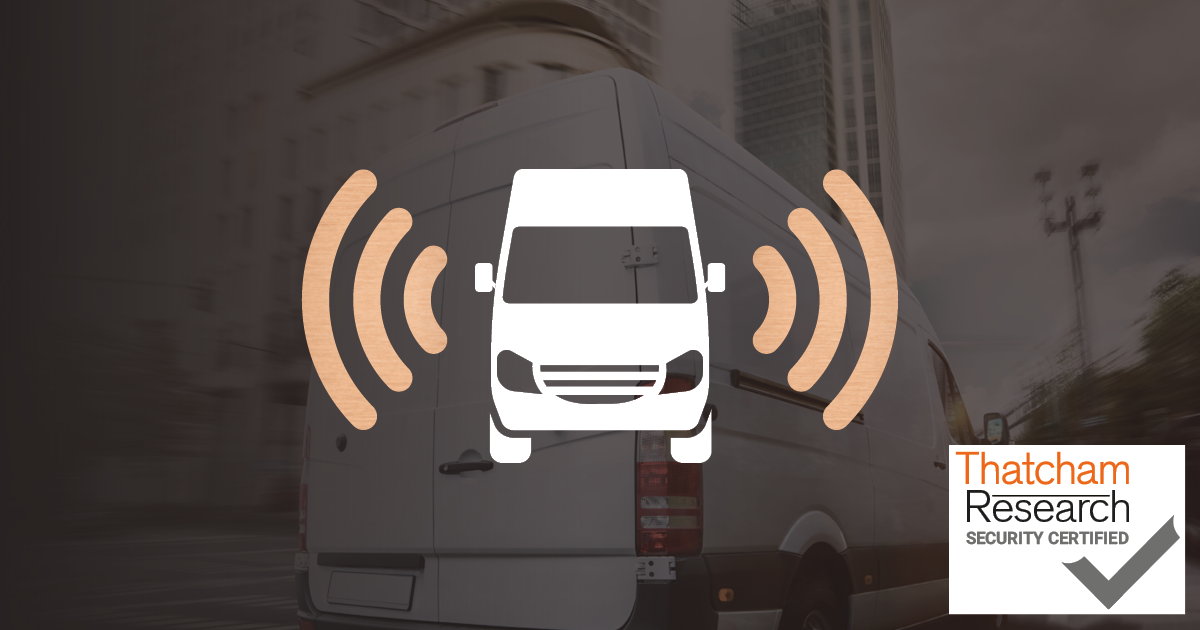
You are protected by the L4V Van Alarm, the only Thatcham certified aftermarket alarm dedicated to the LCV market. The L4V Van Alarm is programmed to interact seamlessly with your vehicle’s original remote and provides features that will add a new level of protection to the load area.
Activate your extended warranty
Arming and Disarming the Alarm
The alarm is programmed to use your vehicle's original remote. This means when you lock and unlock your doors, you will be arming and disarming the alarm at the same time.
Arming and disarming the alarm is signalled by an audible beep.
One beep for armed, two beeps for disarmed.
The system has a 30 second pre-arming period (arming delay) during which the LED is on steady. After 30 seconds, the LED will flash once per second to confirm the alarm is armed.
Disabling Internal Sensors
The alarm system can be armed without activating the internal sensors i.e, Wireless Infrared Sensors (PIR) (Load Area) or Ultrasonics (Cab Area) whilst keeping the exterior perimeter protected (Anti-Peel / Anti-Tamper Sensors and Movement Sensors).
- Make sure the system is disarmed and ignition key is “OFF”.
- Insert the electronic key into it's receptacle. The LED will give a quick flash.
- Close vehicle doors and press the lock button on the vehicle original remote control.
- System activation is confirmed by a beep and a flash of the turn indicators (if features are enabled).
Note: Sensor exclusion is bound to each single arming cycle.
LED / Alarm Trigger Diagnostics
This feature allows you to ascertain the reason why your alarm triggered, and what part of the vehicle caused it.
If you return to your vehicle and the alarm has triggered, the system will give five beeps and five flashes of the turn indicators on disarm (instead of the usual 2 beeps). This will indicate there has been an alarm trigger prior to disarming.
To identify the cause of the last alarm trigger, turn the ignition key “ON” and count the number of flashes of the red status LED installed on the dashboard. It will indicate the last alarm detected. Optical signals are repeated 3 times in a row. To interrupt, turn ignition key “OFF”.
The table below lists the various alarm causes and relative number of LED flashes:
-
LED Flashes
-
Alarm Cause
-
Alarm Cycles
-
-
Wireless door contacts & movement sensors
-
-
-
Wireless infrared sensors (PIR)
-
Note: Once the ignition key has been turned off, it will clear the alarm memory. Make sure you have identified the cause before doing so.
Emergency Override (Service Mode)
Service mode is for ‘’emergency disarming of the alarm’’ or ‘’total disarming of the alarm’’.
To enter service mode:
-
Whilst the alarm is sounding, place the electronic touch key into the receptacle.
- Once you have done this, the siren will stop sounding. This confirms you have disabled the alarm and entered valet mode.
- To exit service mode and restore normal operation, touch the electronic touch key into its receptacle. A high-pitched beep and flash of the status LED will confirm that the system is back to normal mode.
Note: It is extremely important you only do this in an emergency.
PIR (Passive Infrared Sensors)
PIR sensors work by detecting infrared light given off by a moving object, or a person emitting heat. They are positioned to give maximum protection, ready to trigger the alarm if anybody enters the load area.
- To turn "ON" your PIR, press and hold the button on the frontand release the button once the light comes on. It should flash 3 times. This means the PIR is now "ON".
- To Turn "OFF" Your PIR – press and hold the button on the front and release the button once the light comes on. It should flash 2 times. This means the PIR is now "OFF".
- To check the PIR is working, press the button once and it should flash to show it's on. If this doesn’t happen, follow above to ensure it is turned on. If it won’t turn on, please replace the batteries.
MAINTENANCE: The PIR takes 2 x CR2032 batteries; please ensure you check them periodically.
Anti-Peel / Anti-Tamper Sensors
Locks 4 Vans have designed and manufactured vehicle-specific brackets for our electronic sensors, to reduce the risk of the common "Peel and steal" type attack (vehicle dependent).
- To test the sensors, make sure the system is disarmed. Ensure the magnet on the door is next to the electronic sensor on the bracket. Slowly pull the door away from the sensor. The LED should light up for 1-2 seconds.
- If the sensor doesn’t light up, it either means the sensor and magnet were not in it's tolerance range and / or the batteries in the electronic sensor are flat.
MAINTENANCE: Each sensor takes 1 x CR2032 battery, please ensure you check them periodically.
To find out more about the L4V Van Alarm, or to place an order, please email: or call 01474 636441
Frequently asked questions
-
Why do I need an alarm?
We understand the importance of protecting your van against theft - especially the attractive tools and goods it potentially stores. The lounder and longer a theft takes, the more likely a thief will be deterred.
-
How do I know if my alarm is working?
When you lock your vehicle, it will arm the alarm and the LED receptacle will go solid red for 30 seconds (Arming period). After this period, the LED will flash once a second. This now means your alarm is fully armed.
All your perimeter is armed.
- Anti-peels sensors are armed after 30 seconds.
- PIR will be fully armed after 5 minutes.
- L4V Motion sensors for your Pickup canopies will be armed after 5 minutes.
-
Why has my alarm gone off?
It could be one of several reasons: attempted break-in via a door, bonnet, ignition, cab window load area and low battery/power cut.
-
How to find out why my alarm went off?
After the alarm has been activated, disarm the alarm. You will receive 5 beeps to confirm the alarm was activated.
Open the door and turn the ignition on (lights on the dashboard, or as far as it will go before crank starting the engine).
The LED will flash in a sequence to determine the cause of the activation. It will flash the corresponding number 'pause' and continue 3 times in total. For example, 6 flashes is a ultrasonics (Cab).
For a graph list, please refer to the LED / Alarm Trigger see user guide for full breakdown.
-
How do I turn the ultrasonics off in the cab while my child or pet is in there?
The alarm system can be armed without activating the internal volumetric sensors (wireless infrared PIR or Ultrasonics), whilst keeping the exterior perimeter protected.
To do so, proceed as follows:
- Make sure the system is disarmed and ignition key is “OFF”.
- Insert the electronic key into its receptacle; the LED will give a quick flash.
- Close vehicle doors and press the lock button on the vehicle original remote control.
- System activation is confirmed by a beep and a flash of the turn indicators (if features are enabled).
- Note: Sensor exclusion is bound to each single arming cycle i.e. on the next arming cycle it will default to normal active settings.
-
How long does an L4V Van Alarm back-up battery last?
Approximately 2 weeks.
-
How long do the batteries last in my wireless sensors and what batteries do they take?
The batteries in your wireless sensors will last approximately 2 years. However, we advise to replace the door sensors annually. The batteries used are CR2032.
-
How do I check my wireless sensors in the load area / canopy are working?
They all take batteries. To test the batteries are still working, you can check the following:
PIR: Press the button once on the PIR and the LED should come on for a short period of time. This means that your PIR is working and the batteries are ok. If not, you would need to replace the CR2032 batteries and test again.
Wireless Anti-Peels sensors: Bring the magnet close to the sensor and then move the magnet away from the sensor. You should notice a red LED light up as you pull the two apart. If it does, the sensor is working and the batteries are fine. If not, replace the batteries with CR2032’s and test again.
L4V Motion Sensor: Press the button on the center of the sensor, a green light should flash as you press the button. If not replace the batteries with CR2032’s and test again.
We advise you to periodically check and change your batteries. If this doesn’t work, then seek technical advice.
-
How to perform a read back on my alarm?
After the alarm has been activated, disarm the alarm and turn the ignition on. The LED on the receptacle will flash in a sequence to determine the cause of the activation. For the graph list, please see user guide for full breakdown.
-
How to access programming mode?
Please seek advice from Technical Support on 01474 636441.
-
What is the electronic touch key for?
The electronic touch key is used to program the alarm, or it can be used to override the system in an emergency.
-
Why does my alarm not beep anymore when I arm / disarm the alarm?
This may be a programming issue. If you used to have it and now you don’t, most times the user has inserted the override touch key into while the ignition was on, and they entered programming mode. This will wipe all settings and go to default settings. Seek technical advice to re-program for the specific vehicle.
-
Why do my indicators flash all the time when arming?
This may be a programming issue. If you used to have it and now you don’t, most times the user has inserted the override touch key into while the ignition was on, and they entered programming mode. This will wipe all settings and go to default settings. Seek technical advice to re-program for the specific vehicle.
-
Why does my load area siren not sound anymore but my engine bay one does?
This may be a programming issue. If you used to have it and now you don’t, most times the user has inserted the override touch key into while the ignition was on, and they entered programming mode. This will wipe all settings and go to default settings. Seek technical advice to re-program for the specific vehicle.
-

What is the LED receptacle on my dashboard for?
The LED receptacle is used for multiple purposes, but most importantly, to check the armed / disarmed status of your alarm. It is also used to find out why your alarm went off.
-

What is my small electronic touch key for?
It is extremely important you use this very carefully.
It is either used as an emergency override (See user guide for full details).
Enter programming mode to either enable or disable alarm settings (Speak to an alarm technical advisor first). Both are to be used with caution.
-
What will happen if I put the electronic touch key into the LED receptacle on my dashboard?
If the ignition is off, there is nothing to be concerned about. Do not insert the electronic touch key while the ignition is on. This will enter programming mode and clear all the alarm settings.
You would need a technical advisor to talk you through re-programming them back in.
-
What do I do if my alarm goes off and I can’t turn it off with the factory remote?
You will need to use your override touch key to temporarily disable the alarm until you can speak to a technician.
While the alarm is sounding insert your touch key into the receptacle, if accepted it will turn the alarm off. Full details are within the user guide.
If this doesn’t work, you may have a power issue to the alarm and you will need to seek technical advice.
DO NOT CUT THE WIRES TO THE LOAD AREA SIREN OR ENGINE BAY SIREN. THIS CAN HAVE SEVERE CONSEQUENCES TO THE ALARM MODULE, RESULTING IN PERMANENT DAMAGE AND VOIDING ANY WARRANTY.
-
What if my vehicle battery goes flat?
Once your vehicle battery voltage drops below 9V, the alarm will sound to alert you there is not enough power. The siren will continue to sound for up to 18hrs (Depending on the charge in the sirens back up battery) or until power is re-applied.
The emergency override touch key would not turn the alarm off in this instance. To stop the alarm from continuously sounding, you would need to either jump start the vehicle, connect a battery charger or replace the battery.
-
How many years warranty does the alarm have?
2-years product.
Thatcham Certificate
L4V Van Alarm - Thatcham Certificate
Citroen Relay 2006> Locks and Security Solutions
Browse L4V's range of locks and security solutions for the Citroen Relay 2006>
Hooklock/Deadlock fitting positions available
Side door
-
High
-
Mid
(Not suitable for glazed)
-
Low
Barn doors
-
High
-
Mid
(Not suitable for glazed)
-
Low
L4V Hook Lock
The L4V Hook Lock is a mechanical deadlock operating independently from the manufacturers' locking system. A deadlocking hook bolt engages into its opposing body section. Operated by its high-security external key under full control of the driver. Suitable for owner-drivers or applications where the driver can be relied upon to operate the lock.
Recommended Fitting Position
We recommend the L4V Hook Lock fitted mid-position on the side load door and the L4V Hook Lock fitted mid-position on the rear barn doors.
L4V Deadlock
The L4V Deadlock is a mechanical deadlock operating independently from the manufacturers’ locking system. It is very similar to the L4V Hook Lock however this lock engages a ‘straight bolt’ (20mm-50mm) into its opposing body section. Operated by its high-security external key under full control of the driver. Suitable for owner-drivers or applications where the driver can be relied upon to operate the lock. The L4V Deadlock is recommended for use on the vehicles cab doors.
Request a quote
L4V Slamlock
The L4V Slamlock is primarily designed for couriers, multi-drop delivery drivers and any operations where a driver may be regularly in and out of a loading area throughout the day.
The L4V Slamlock safeguards against the driver forgetting to lock the doors. Once the door is shut it locks automatically and can only be opened using the L4V Slamlock key, reducing the chances of theft.
L4V Statement Lock
The L4V Statement Lock mounts externally to the doors of the vehicle, bracing them together while providing an effective visual deterrent. When fitted higher in the door it helps to reduce the risk of the door being bent down. As a deadlock working independently from the manufacturers’ locking system, it offers flexibility to the operator of the vehicle allowing them to use this extra security when required.
Request a quote
L4V Slamhandle
The L4V Slamhandle is a powder-coated stainless steel replacement handle with internal strengthening plates and an L4V Slamlock. Once the door is shut it locks automatically and can only be opened using the Slamlock key.
L4V External Shielding
The L4V External Latch Shields reduces the risk of the door skin being punctured to gain access to the internal door mechanism. Available for the N/S and O/S sliding doors in powder coated black and stainless steel.
Request a quote
L4V Anti-Peel Kit
L4V Anti-Peel Kits have been developed to reduce the risk of the common ‘peel and steal’ type of attack. Designed to reduce door peeling, this solution is fitted to the front edge of the vehicle’s side load door. We recommend using this product in conjunction with an L4V Hook Lock in the high position of the rear end of the same side load door.
Available for the N/S and O/S sliding doors in a HIGH and LOW position.
L4V Handle Shields
Break-ins can occur as a result of the handle being spiked to gain access to the internal mechanisms that open the door. The L4V Handle Shields are door specific and reduce the risk of this method of attack.
Request a quote
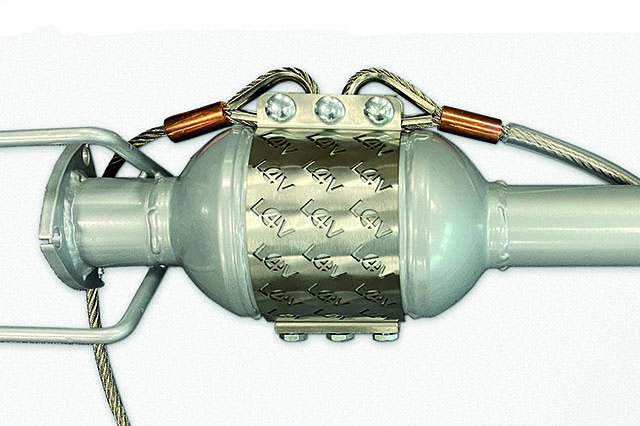
L4V Cat Guard
The L4V Cat Guard has been specifically designed and tested to reduce the risk of theft of Catalytic Converters. It provides a heavy-duty shield that is fixed together using shear bolts and mounted to the chassis using high-security stainless steel cables.
Not suitable for Electric and Hybrid variants.
Request a quote